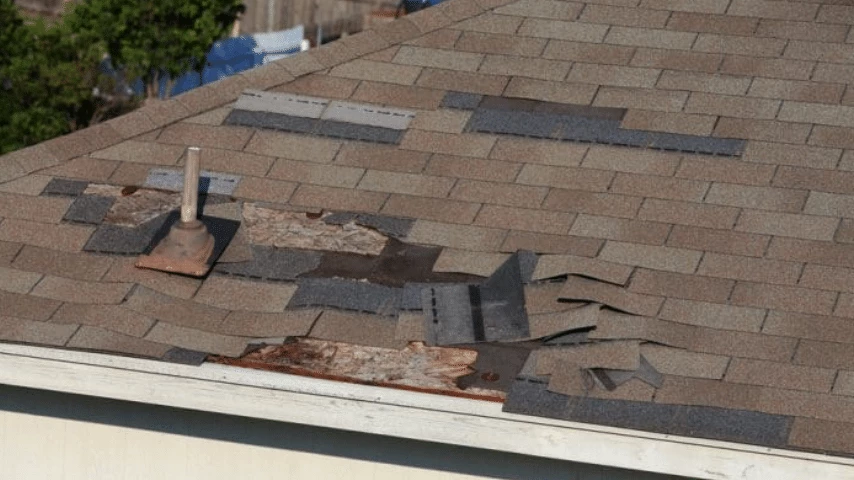
Asphalt shingles are a popular roofing material known for their durability and affordability. However, over time, these shingles can become damaged due to various factors such as weathering, impact, or improper installation.
At Eason Roofing, we understand the importance of promptly addressing damaged asphalt shingles to prevent further issues and extend the life of your roof.
Assess the Damage
Assessing the damage is the crucial first step in any roofing repair project. Take the time to thoroughly inspect your roof, examining it from all angles and noting any areas of concern. Look closely for signs of wear and tear, such as cracked or curled shingles, which may indicate weathering or age-related deterioration. Additionally, check for any missing shingles or areas where shingles appear to be lifted or dislodged, as these can leave your roof vulnerable to leaks and water damage.
As you assess the damage, pay attention to the condition of the underlying roof structure and substrate. Look for signs of rot, decay, or water infiltration, as these issues may require additional attention beyond simple shingle replacement.
By carefully documenting the extent of the damage, you’ll be better equipped to develop a comprehensive repair plan and ensure that your roof receives the care and attention it needs to remain strong and resilient for years to come.
Gather Materials
Once you’ve identified the damaged areas, gather the necessary materials for the repair process. You’ll typically need replacement asphalt shingles that match your present ones, roofing cement, a caulking gun, roofing nails, a hammer, pry bar, and utility knife. These materials will streamline the repair process and ensure you have everything you need to complete the job.
Remove Damaged Shingles
Removing damaged asphalt shingles is a delicate process that requires precision and care to avoid causing further harm to your roof. Gather the necessary tools: a pry bar, hammer, and utility knife. Approach the damaged area cautiously, wearing appropriate protective gear to ensure your safety.
Using the pry bar, gently lift the edges of the damaged shingles to expose the roofing nails beneath. With the hammer, carefully loosen and remove the nails one by one, not disturbing the surrounding shingles or underlying roofing material. Patience is vital as you work to release each nail without causing unnecessary damage.
Prepare the Roof Surface
Once the damaged shingles have been carefully removed, it’s time to shift your focus to preparing the roof surface for installing new shingles. Begin by meticulously inspecting the exposed area and scouring it for any remnants of debris, nails, or adhesive residue left behind. Clearing these remnants is crucial to ensuring a seamless and secure fit for the replacement shingles.
To begin getting your roof ready for new shingles, you should thoroughly wash the surface to eliminate any debris or impurities. This way, a clean canvas will be created for the new shingles to cling to, ensuring they operate at their best and last as long as possible. It would help if you were looking for indications of underlying damage, such as rot or decay, to forestall future degradation and guarantee the structure’s integrity.
By meticulously prepping the roof’s surface, you may provide the groundwork for a successful and long-lasting repair that will shield your roof from the elements for many years.
Install Replacement Shingles
With the roof surface prepared, it’s time to install the replacement asphalt shingles. Start by applying a small amount of roofing cement to the back of each shingle to provide extra adhesion. Position the replacement shingle in place, align it with the surrounding shingles, and nail it securely into position using roofing nails and a hammer. Repeat this process for each damaged shingle until all repairs are complete.
Seal the Edges
Sealing the edges of newly installed shingles is essential for long-term integrity of your roof. With a bead of roofing cement applied along the edges and seams, you create a watertight barrier that prevents moisture infiltration and guards against potential leaks. Using a caulking gun ensures precise application, allowing you to seal any gaps or exposed nail heads effectively. This additional layer of protection not only reinforces the bond between shingles but also strengthens the overall structure of your roof, enhancing its resilience against harsh weather conditions and environmental elements.
By sealing the edges properly, you can prolong roof life and reduce risk of future damage, providing peace of mind and protection for your home for years to come. Trust in the expertise of Eason Repair to handle this crucial step with precision and care, ensuring a job well done every time.
Inspect and Test
After completing the repairs, meticulous inspection is imperative to guarantee the efficacy of the work done. Thoroughly scrutinize the repaired sections to verify that the newly installed shingles are firmly secured and seamlessly integrated with the surrounding ones.
Check for proper alignment, ensuring the shingles sit flush and uniform across the roof’s surface. Please pay close attention to the edges and seams to confirm they are adequately sealed with roofing cement, preventing potential water intrusion.
Following the visual inspection, a water test will verify the integrity of repairs. Using a hose, gently spray the repaired areas, simulate rainfall, and closely observe for any signs of leaks or water infiltration. Should any issues arise during the test, promptly address them by making necessary adjustments or additional repairs to fortify your roof against potential water damage.
Repairing damaged asphalt shingles can be a manageable task. By following these seven easy steps, you can effectively address issues with your roof and prolong its lifespan without needing costly professional repairs.
However, if you need help with how to proceed or if the damage is extensive, please contact the experts at Eason Roofing for professional assistance. With our expertise and dedication to quality craftsmanship, we’ll ensure that your roof remains strong, secure, and protected for years to come.
Repair Your Roof with Ease Today!
At Eason Repair, we’ve simplified the process into seven easy steps so you can confidently restore your roof. Our expert guidance ensures that you’ll breeze through the repairs effortlessly, extending the lifespan of your roof and safeguarding your home from leaks and water damage.
Don’t let damaged shingles compromise your roof’s integrity any longer—Trust Eason Repair to provide the solutions you need to keep your roof in top condition. Contact us today to get started and enjoy peace of mind knowing your roof is in capable hands. Let’s repair your roof with ease – together!


